
I've been in a bit of a funk lately with dinner, so when someone posted a falafel recipe on a blog I watch, I decided I wanted to make some. I just love that stuff. I modified the recipe, so in order to remember what I did, I'm going to write it down. Matt said it was the best falafel and pita I've ever made. Boom.
Falafel: makes enough to stuff about 3 full pita rounds (6 halves cut open)
1/2 C dried bread crumbs
handful flat leaf parsley
1 1/2 tsp. ground cumin
1/4-1/2 tsp (just shook it in?) turmeric
1/2 tsp. salt
1/4 tsp ground red pepper
2 garlic cloves, crushed
1/2 medium onion, diced
1 lg. egg
1 (15-oz) can chickpeas (garbanzo beans), rinsed and drained
1 Tbsp olive oil
Place everything in a food processor; process mixture until smooth. Divide mixture into 16-18 equal portions, and shape each portion into a 1/4-inch-thick patty. Heat additional olive oil in a nonstick skillet over medium-high heat. Add patties, and cook until patties are browned on both sides. I had to add oil every time I put a new batch in the pan.
Salad with a dill sauce: (I know falafel is usually served with cucumbers and tzatziki sauce, but I didn't have cucumbers nor did I have tahini. This worked out really well and complimented the falafel well)
Romaine Lettuce, chopped thinly
2 Tbsp (ish) mayo
3 Tbsp (ish) sour cream thinned with milk to a yogurt consistency*
a generous amount of dried dill
a splash or two of lemon juice
Mix it all together.
*Or just use plain yogurt! I just didn't have any on hand.
Pitas: Makes 8 whole pita rounds. I've made these 3-4 times now and I have vowed to never buy store pitas again. They are soooooo much better! The original recipe is here.
Ingredients
1 1/8 C. warm water (about 110*)
3 C. AP Flour
1 tsp salt (I always use kosher in baking)
1 Tbsp vegetable oil
1 1/2 tsp white sugar
1 1/2 tsp active dry yeast
1. Preheat oven to 500*. Place all ingredients in bread pan of bread machine, select Dough setting and start. Move on to step 2 after machine beeps and is done.
2. Turn dough onto a lightly floured surgace. Gently roll and stretch dough into a 12 inch rope. With a sharp knife or dough cutter, divide dough into 8 pieces. Roll each into a smooth ball. With a rolling pin, roll each ball into a 6-7 in. circle. Set aside on a lightly floured counterop and cover with a tea towel until you put it in the oven.
3. Place 2-3 pitas on a wire cookie cooling rack. Place rack directly on the oven rack. Bake 4-5 min. until puffed and top is beginning to brown.
4. Remove from oven and immediately place on a plate and put a damp kitchen towel over them until soft. Onve pitas are softened, either cut in half or split top edge to fill the pitas. They can be stored in a plastic bag in the fridge for several days or in the freezer for 1-2 months.
Glorious. Stuff the halved pitas with the salad a falafel and enjoy!
Thursday, November 19, 2009
Thursday, October 8, 2009
A better burger bun
 I've made buns before, but I tried a new recipe today (see a trend?) and it was FABULOUS. It's pretty much a King Arthur's Beautiful Burger Bun recipe, but I used bread flour instead of All Purpose. Oh, and since I didn't have instant yeast I proofed mine in warm water with the sugar. The result was super delicious.
A better burger bun- 8 buns
3/4 C. water
2 Tbsp butter
1 large egg
3 1/2 C. bread flour
1/4 C. sugar
1 1/4 tsp kosher salt
1 Tbsp yeast
Directions
- If using active dry yeast, proof it in the water with the sugar and add the rest of the ingredients after it bubbles. If using instant yeast, just add all the ingredients at the same time.
- Knead by hand or mixer. (If using a mixer, know mine was a stickier dough and did not clear the sides of the bowl. I had to scrape it down a couple times.) Form it into a ball if it isn't already.
- Place it in a greased (I used spray) bowl and cover it for 1 hour or until double.
- Gently deflate the dough and divide it into 8 pieces. Shape each piece into a 1"(ish) thick and about 3 in. across.
- Place on a lightly greased baking sheet, cover, and let rise 30-60 min. or until very puffy.
- Lightly brush with an egg wash.
- Bake at 375* for 12-15 min. or until golden.
Monday, October 5, 2009
A better flour tortilla
I have used the same tortilla recipe for about 8 years now, but I've always felt they lacked in the texture department. After having fresh tortillas in the store that had great texture but horrible taste, I set out to find a better tortilla recipe. I ended up mixing my original recipe with a recipe I found online (can't find it now or I'd link it).
I've made these a couple times with minor variations in cooking technique, but tonight's tortillas were the best so I'm set to type it up now. =)
Flour Tortillas-makes 8 large tortillas
Ingredients:
2 C. all-purpose flour
1 tsp baking powder
1 tsp kosher salt (I'm sure regular salt works fine, but I always cook with kosher)
1/4 C vegetable shortening
3/4 C warm milk
Directions:
**I have stacked them in between pieces of wax paper and put them in a ziploc in the fridge for a couple hours. It worked just fine after sitting a couple hours, but the next day the final product was a little brittle and not quite chewy.
I've made these a couple times with minor variations in cooking technique, but tonight's tortillas were the best so I'm set to type it up now. =)
Flour Tortillas-makes 8 large tortillas
Ingredients:
2 C. all-purpose flour
1 tsp baking powder
1 tsp kosher salt (I'm sure regular salt works fine, but I always cook with kosher)
1/4 C vegetable shortening
3/4 C warm milk
Directions:
- Mix together first 4 ingredients, cutting in the shortening with a pastry cutter or two knives or forks.
- Add the warm milk a little at a time until completely incorporated.
- Flour a workspace and dump out dough. It'll probably be a little sticky, so flour your hands and have a little extra flour on the side. Hand kneed the dough for about 5 min.
- Put in a bowl and cover with a damp cloth. Let it sit for about 15-20 min. If it's too tough or rubbery, let it sit a few more min.
- After 20 min. cut the dough into 8 equal parts. Roll these pieces into balls.* Flatten into a disk and roll into tortillas. It's okay if they're not quite as large as you want them. Cover and let sit another 5-10 min.**
- Warm up a cast iron skillet (or a non-stick pan, but honestly, they cook better on cast iron) Keep it dry-don't add oil or anything. Once the pan is nice and hot, slap your tortillas on about 30 seconds on each side (more or less depending on how hot your pan really is). If your pan is hot enough, they'll start to puff up and get big bubbles. Keep the cooked ones warm under a clean kitchen towel until you're ready to eat. them
**I have stacked them in between pieces of wax paper and put them in a ziploc in the fridge for a couple hours. It worked just fine after sitting a couple hours, but the next day the final product was a little brittle and not quite chewy.
Thursday, September 10, 2009
Artichoke and Spinach Lasagna
I whipped this up last night on the fly. Nothing too fancy, but it was good.
Artichoke and Spinach Lasagna-8X8 pan so about 4-6 servings
1 small container ricotta cheese
1/2-1 can artichoke hearts
a couple good handfuls of fresh spinach (2 cups?), chopped thinly
a couple handfuls of shredded mozzarella (plus some to top)
some fresh parmesan (if you have it)
2 cloves garlic, pressed
fresh nutmeg to taste (I grate it on the small side of my cheese grater.)
fresh ground pepper to taste
salt to taste
Red sauce
1 egg
8-9 lasagna noodles, depending on the type you use
Directions
- Combine all filling ingredients except the egg. I don't pre-cook the spinach. I always add the egg last so I can actually do my spices "to taste". Add the egg and mix well.
- If you're using the noodles you pre-cook, you only need 8 noodles because you'll have to cut off the long end to fit the pan. I just used the pieces I cut off to make up the last noodle. So, cook or don't cook the noodles, depending on the type.
- Spread a thin layer of sauce on the bottom of the pan, place 3 noodles on the bottom. Spread a layer of filling, sauce, 3 more noodles, repeat till you've used it all up. End with noodles, sauce and top with the reserved mozzarella.
- Cook for 30-40 min. on 350* covered and then uncover another 10 min. or so to brown the cheese on top.
Thursday, August 27, 2009
Ideas for vegetable packed main dishes
A friend asked for some help coming up with veggie packed main dishes that her kids would eat.
Here are some of my favorites:
Veggie packed chili:
Chop an assortment of veggies into smallish cubes (carrots, celery, onions, bell peppers, zucchini, corn, hominy)
Saute the veggies until tender (add zucchini a little later than the others since it cooks quickly) and add to canned chili or homemade chili. I have a recipe for homemade if you want that.
Broccoli, Cheese and Rice dish (serves 6-8 as side or 3-4 main)
1 medium onion, chopped
1 (10 oz.) pkg frozen, chopped broccoli (or equivalent fresh broccoli, chopped)
1 (7 oz) box long grain and wild rice mix
1 Tbsp butter
salt to taste
2 Tbsp. flour
1 C. evaporated milk
1 C. cheddar cheese
*You can also add cooked chicken to make it heartier...*
Lightly coat a 9X13 baking dish with cooking spray. If using frozen broccoli, microwave for 5 min. and drain. If using fresh, just chop it up. Add to baking dish. Prepare rice according to package. Add to baking dish. Suate onion and add to dish. Melt butter in the onion pan and stir in salt and flour. Add milk gradually, stirring to mix well. Cook until thickened, about 3-5 min. Take off heat and stir in cheese until melted. Add cheese sauce to dish and stir. Bake at 350 for 30 min.
Chicken and Broccoli Braid
This is good, though I don't always add the dill. You can change the chicken to broccoli ratio so there is more broccoli and less chicken. You can also use pizza dough if you don't want to use the crescents. I have another variation that uses cream cheese and you roll them into individual bundles if anyone's interested.
Summery Baked Tomatoes
While I've never tried this, I just saw it today and it looks delicious.
Taco Salad (a suggestion, but if you need a recipe, ask) or Something like Cafe Rio Salad
Cold Tortellini Salad-serves 8
16 oz cheese tortellini, cooked to al dente, drain and rinse
Optional additions:
1 (6 oz) jar marinated artichoke hearts
1 can pitted black olives
Your choice of type and amount of chopped: broccoli, cauliflower, cherry tomatoes, red or green onion, bell peppers, carrots, cucumbers, fresh mozzarella, feta, or parm. cheese
Dressing:
1/4 c. olive oil
3/4 C. balsamic vinegar
garlic salt to taste
Add veggies and cheese to cooked pasta. Combine dressing ingredients and mix into salad. Refrigerate until ready to serve. Toss again before you serve to see if you need to add a bit more dressing.
Cold veggie pizza
Easy Bean and Rice burritos with Veggie add ins
Vegetable Quesadillas - serves 2-3
1 Zucchini, cubed
1/2 Onion, sliced
1 green bell pepper, sliced
1 garlic clove pressed or diced
fresh lime juice from 1 lime
Taco seasoning packet (not necessarily the whole thing...I just make my own concoction, so I don't know how much you'd need of this...to taste) or your own mixture of chili powder, cumin, chipotle chili powder and salt
Cheese (mozz. is low fat but not high flavor. I don't mind using it. You can use a mexican blend, asedero cheese, cheddar or Colby or Monterrey jack. Whatever you love.)
Large flour tortillas (I use burrito sized, but soft taco sized would work for kids)
A drizzle of oil to saute veggies
Directions:
Saute the onion and bell pepper. Just before they are tender, add in the zucchini and garlic. Sprinkle seasonings and lime over the top, adding a little more oil if necessary. Season with salt to taste. Take off the burner.
Sprinkle cheese over half of each tortilla, top with veggies, and sprinkle a little more cheese on top. Fold over and cook on a cast iron pan (med. heat) until cheese melts and tortilla's toasty.
Shredded zucchini and egg:
Shred zucchini and saute. Pour scrambled eggs over top and cook. Season with salt and pepper. Sprinkle cheese on top and cover to help melt. Serve with veggie sides and rolls or bread.
Saturday, June 27, 2009
June Daring Baker: Bakewell Tart/Pudding
 The June Daring Bakers' challenge was hosted by Jasmine of Confessions of a Cardamom Addict and Annemarie of Ambrosia and Nectar. They chose a Traditional (UK) Bakewell Tart... er... pudding that was inspired by a rich baking history dating back to the 1800's in England.
I'd never heard of this, but was excited to make it since the hosts' pictures looked so tantalizing. I as I was making it, I thought it was going to turn out perfectly. By the picture you can tell that it didn't quite turn out perfectly!
When it finished cooking I thought back to where I went wrong since the top got a little too brown and the frangipane was the wrong consistency (and the middle was not quite done). As I thought about it, I realized I did a few things wrong:
- The pie pan I thought was 9" was really larger...9 1/2 or 10 in. Oops.
- I totally forgot to put the flour in the frangipane! My 18 mo. old was "helping" me cook, and I just got too distracted. Plus I can always use my "I'm 9 mo. pregnant!" excuse since pregnancy seems to make me very forgetful in the kitchen.
- My crust seemed waaaayyy too dry after adding the amount of water in the recipe, so I added an extra Tbsp. I think that made it too wet. It didn't taste bad, I think it's just not quite what it should have been.
- I rolled the shortening crust a little too thin since my pan was too big.
I made some low sugar blueberry jam. I just used the Ball no-sugar pectin recipe and added 1 cup of sugar to the whole batch. It worked nicely. I think a tarter jam could have worked well too. Cranberry, apricot, etc. I wouldn't mind trying it again, especially if I were to do mini-tartlets. I think that would be quite nice.
Bakewell Tart...er...Pudding
Makes one 23cm (9” tart)
Prep time: less than 10 minutes (plus time for the individual elements)
Resting time: 15 minutes
Baking time: 30 minutes
Equipment needed: 23cm (9”) tart pan or pie tin (preferably with ridged edges), rolling pin
One quantity sweet shortcrust pastry (recipe follows)
Bench flour
250ml (1cup (8 US fl. oz) jam or curd, warmed for spreadability (My homemade stuff didn't need any warming)
One quantity frangipane (recipe follows)
One handful blanched, flaked almonds
Assembling the tart
Place the chilled dough disc on a lightly floured surface. If it's overly cold, you will need to let it become acclimatised for about 15 minutes before you roll it out. Flour the rolling pin and roll the pastry to 5mm (1/4”) thickness, by rolling in one direction only (start from the centre and roll away from you), and turning the disc a quarter turn after each roll. When the pastry is to the desired size and thickness, transfer it to the tart pan, press in and trim the excess dough. Patch any holes, fissures or tears with trimmed bits. Chill in the freezer for 15 minutes.
Preheat oven to 200C/400F.
Remove shell from freezer, spread as even a layer as you can of jam onto the pastry base. Top with frangipane, spreading to cover the entire surface of the tart. Smooth the top and pop into the oven for 30 minutes. Five minutes before the tart is done, the top will be poofy and brownish. Remove from oven and strew flaked almonds on top and return to the heat for the last five minutes of baking.
The finished tart will have a golden crust and the frangipane will be tanned, poofy and a bit spongy-looking. Remove from the oven and cool on the counter. Serve warm, with crème fraîche, whipped cream or custard sauce if you wish.
When you slice into the tart, the almond paste will be firm, but slightly squidgy and the crust should be crisp but not tough.
Jasmine’s notes:
• If you cannot have nuts, you can try substituting Victoria sponge for the frangipane. It's a pretty popular popular cake, so you shouldn't have any troubles finding one in one of your cookbooks or through a Google search. That said, our dear Natalie at Gluten a Go Go has sourced some recipes and linked to them in the related alt.db thread.
• You can use whichever jam you wish, but if you choose something with a lot of seeds, such as raspberry or blackberry, you should sieve them out.
• The jam quantity can be anywhere from 60ml (1/4 cup) to 250ml (1cup), depending upon how “damp” and strongly flavoured your preserves are. I made it with the lesser quantity of home made strawberry jam, while Annemarie made it with the greater quantity of cherry jam; we both had fabulous results. If in doubt, just split the difference and spread 150ml (2/3cup) on the crust.
Annemarie’s notes:
• The excess shortcrust can be rolled out and cut into cookie-shapes (heck, it’s pretty darned close to a shortbread dough).
Sweet shortcrust pastry
Prep time: 15-20 minutes
Resting time: 30 minutes (minimum)
Equipment needed: bowls, box grater, cling film
225g (8oz) all purpose flour
30g (1oz) sugar
2.5ml (½ tsp) salt
110g (4oz) unsalted butter, cold (frozen is better)
2 (2) egg yolks
2.5ml (½ tsp) almond extract (optional)
15-30ml (1-2 Tbsp) cold water
Sift together flour, sugar and salt. Grate butter into the flour mixture, using the large hole-side of a box grater. Using your finger tips only, and working very quickly, rub the fat into the flour until the mixture resembles bread crumbs. Set aside.
Lightly beat the egg yolks with the almond extract (if using) and quickly mix into the flour mixture. Keep mixing while dribbling in the water, only adding enough to form a cohesive and slightly sticky dough.
Form the dough into a disc, wrap in cling and refrigerate for at least 30 minutes
Jasmine’s notes:
• I make this using vanilla salt and vanilla sugar.
• If you wish, you can substitute the seeds of one vanilla bean, one teaspoon of vanilla paste or one teaspoon of vanilla extract for the almond extract
Frangipane
Prep time: 10-15 minutes
Equipment needed: bowls, hand mixer, rubber spatula
125g (4.5oz) unsalted butter, softened
125g (4.5oz) icing sugar
3 (3) eggs
2.5ml (½ tsp) almond extract
125g (4.5oz) ground almonds
30g (1oz) all purpose flour
Cream butter and sugar together for about a minute or until the mixture is primrose in colour and very fluffy. Scrape down the side of the bowl and add the eggs, one at a time, beating well after each addition. The batter may appear to curdle. In the words of Douglas Adams: Don’t panic. Really. It’ll be fine. After all three are in, pour in the almond extract and mix for about another 30 seconds and scrape down the sides again. With the beaters on, spoon in the ground nuts and the flour. Mix well. The mixture will be soft, keep its slightly curdled look (mostly from the almonds) and retain its pallid yellow colour.
Annemarie’s notes:
• Add another five minutes or more if you're grinding your own almonds or if you're mixing by hand (Heaven help you).
Friday, June 19, 2009
White Chocolate Blondies with Goodies
I got the base of the recipe from Picky Palate's White Chocolate Butterfinger Blondies, but I made a number of modifications since I didn't have butterfingers on hand! I made these for a funeral today and one of the people in charge of the food hounded me until I got her the recipe! I was in such a rush to get them to the church on time, I didn't get a picture. Matt said he really liked them too.
White Chocolate Blondies with Goodies
1/2 C. butter
1 1/2 C. white chocolate chips
1 C. white sugar
1/2 C. brown sugar
2 C. flour (I used 1 C. wheat and 1 C. white with good results)
1 tsp baking powder
1 tsp salt
1/2 C. semi-sweet chocolate chips
3/4 C. coconut
3/4 C. chopped walnuts
4 eggs
4 Tbsp sour cream
Powdered sugar for dusting
Directions
- Preheat oven to 350* F
- Melt butter in microwave safe bowl. Stir in white chips until melted and smooth. You may have to nuke it a little after you add the chips to help them melt.
- In a large bowl add the sugar, brown sugar, flour, baking powder, salt. In a small bowl whisk the eggs and sour cream. Pour into the dry ingredients along with the melted white chip mixture. Mix until just combined. Incorporate the semi-sweet chips, coconut, and walnuts.
- Pour into a 9X13 baking dish lined with foil that's been sprayed with cooking spray (for easy clean up. You don't have to do that. Just remember to spray your dish regardless.).
- Bake for 30-35 min. or until toothpick comes clean from center. Dust with powdered sugar. Let cool before cutting.
Sunday, June 14, 2009
June Daring Cook: Dumpling/Potstickers
This month's challenge was hosted by Jen from Use Real Butter. Thanks for a great challenge! I really enjoyed this one.
I've made potstickers before, but this challenge was still great since I've never made my own wrappers before. Final results: Matt and I loved how the wrappers turned out. We didn't love the pork filling recipe, but it wasn't bad.
I was a little over ambitious and also made vegetable sesame pancake sandwiches (as found at The Dumpling House in NYC). I made that all from scratch as well. While the dinner was quite successful, between the two things it took about 6 hours of cooking after I got home from church!
I steamed the dumplings in a metal basket lined with cabbage leaves.
That worked nicely except I put a few too many in at once and they kind of stuck together.
That worked nicely except I put a few too many in at once and they kind of stuck together.

Here is our whole dinner. The sesame "pancake" bread worked really great after I added a whole lot of extra flour! It was liquid goo after the first rise so I added flour until I could actually handle it. Part of the problem was attempting to do it in the bread maker like the recipe says. Just didn't work the flour in well enough for some reason. I should have just used my KitchenAid.

Final product was really great though. We stuffed it with yellow squash, red onions, zucchini, and carrots. The sauce on it could have used a little help, but it was still good. We served the dumplings with soy sauce and a Chinese red chili sauce.


Chinese Dumplings/Potstickers
pork filling:
1 lb (450g) ground pork
4 large napa cabbage leaves, minced
3 stalks green onions, minced
7 shitake mushrooms, minced (if dried - rehydrated and rinsed carefully)
1/2 cup (75g) bamboo shoots, minced
1/4 (55g) cup ginger root, minced
3 tbsp (40g) soy sauce
2 tbsp (28g) sesame oil
2 tbsp (16g) corn starch
dough: (double this for the amount of filling, but easier to make it in 2 batches - or just halve the filling recipe)
2 cups (250g) all-purpose flour
1/2 cup (113g) warm water
flour for worksurface
dipping sauce:
2 parts soy sauce
1 part vinegar (red wine or black)
a few drops of sesame oil
chili garlic paste (optional)
minced ginger (optional)
minced garlic (optional)
minced green onion (optional)
sugar (optional)
Combine all filling ingredients in a large mixing bowl and mix thoroughly (I mix by clean hand). Cover and refrigerate until ready to use (up to a day, but preferably within an hour or two).
Make the dough, Method 1: Place the flour in the work bowl of a food processor with the dough blade. Run the processor and pour the warm water in until incorporated. Pour the contents into a sturdy bowl or onto a work surface and knead until uniform and smooth. The dough should be firm and silky to the touch and not sticky.[Note: it’s better to have a moist dough and have to incorporate more flour than to have a dry and pilling dough and have to incorporate more water).
Make the dough, Method 2 (my mom’s instructions): In a large bowl mix flour with 1/4 cup of water and stir until water is absorbed. Continue adding water one teaspoon at a time and mixing thoroughly until dough pulls away from sides of bowl. We want a firm dough that is barely sticky to the touch.
Both dough methods: Knead the dough about twenty strokes then cover with a damp towel for 15 minutes. Take the dough and form a flattened dome. Cut into strips about 1 1/2 to 2 inches wide. Shape the strips into rounded long cylinders. On a floured surface, cut the strips into 3/4 inch pieces. Press palm down on each piece to form a flat circle (you can shape the corners in with your fingers). With a rolling pin, roll out a circular wrapper from each flat disc. Take care not to roll out too thin or the dumplings will break during cooking - about 1/16th inch. Leave the centers slightly thicker than the edges. Place a tablespoon of filling in the center of each wrapper and fold the dough in half, pleating the edges along one side (see images in post for how to fold pleats). Keep all unused dough under damp cloth.
To boil: Bring a large pot of water to a boil and add dumplings to pot. Boil the dumplings until they float.
To steam: Place dumplings on a single layer of napa cabbage leaves or on a well-greased surface in a steamer basket with lid. Steam covered for about 6 minutes.
To pan fry (potstickers): Place dumplings in a frying pan with 2-3 tbsp of vegetable oil. Heat on high and fry for a few minutes until bottoms are golden. Add 1/2 cup water and cover. Cook until the water has boiled away and then uncover and reduce heat to medium or medium low. Let the dumplings cook for another 2 minutes then remove from heat and serve.
To freeze: Assemble dumplings on a baking sheet so they are not touching. It helps to rub the base of the dumpling in a little flour before setting on the baking sheet for ease of release. Freeze for 20-30 minutes until dumplings are no longer soft. Place in ziploc bag and freeze for up to a couple of months. Prepare per the above instructions, but allow extra time to ensure the filling is thoroughly cooked.
Wednesday, May 27, 2009
May Daring Baker: Apple Strudel from Scratch
The May Daring Bakers’ challenge was hosted by Linda of make life sweeter! and Courtney of Coco Cooks. They chose Apple Strudel from the recipe book Kaffeehaus: Exquisite Desserts from the Classic Cafés of Vienna, Budapest and Prague by Rick Rodgers.
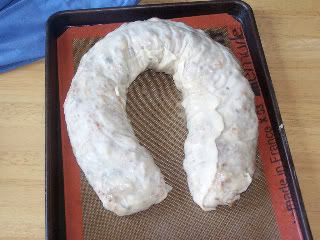
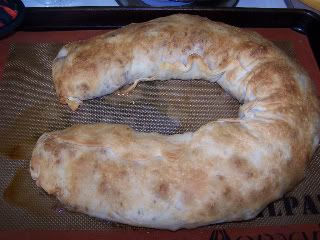
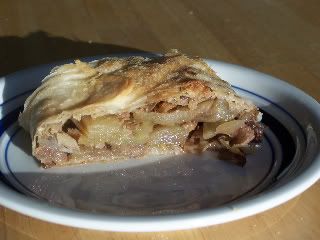
Success! I quite enjoyed this challenge. I made this for our Memorial Day BBQ dessert. We had friends over and everyone had good things to say about it. Nice and flaky crust. I could have probably used a little less filling (though I didn't even use the full 2 lbs. of apples in the recipe) so I could have rolled it a little tighter and had a few more layers of flaky crust.
I served it with vanilla ice cream. I wanted to do some creative filling, but my husband wanted the apple so I used the recipe given with the challenge. It was good (maybe a little boring, but still good). Light and not too rich. The dough was really easy to work with (I let it sit the full 90 min.) and I was only a few inches shy of the 2'X3'. The biggest hole in my dough (which was not big) was from my 18 mo. old son trying to sample it! haha.
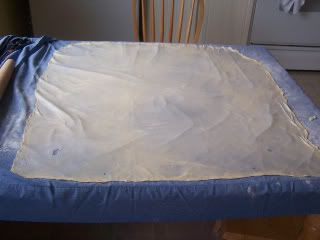
I don't even own a table cloth, so I used an old, clean sheet. It was the best I could think of. Worked well enough. I had my husband help me roll it up and transfer it to the baking sheet.
I wish I could capture it better with the photography.
Preparation time
Total: 2 hours 15 minutes – 3 hours 30 minutes
15-20 min to make dough
30-90 min to let dough rest/to prepare the filling
20-30 min to roll out and stretch dough
10 min to fill and roll dough
30 min to bake
30 min to cool
Apple strudel
from “Kaffeehaus – Exquisite Desserts from the Classic Cafés of Vienna, Budapest and Prague” by Rick Rodgers
2 tablespoons (30 ml) golden rum
3 tablespoons (45 ml) raisins
1/4 teaspoon ground cinnamon
1/3 cup plus 1 tablespoon (80 g) sugar
1/2 cup (1 stick / 115 g) unsalted butter, melted, divided
1 1/2 cups (350 ml) fresh bread crumbs
strudel dough (recipe below)
1/2 cup (120 ml, about 60 g) coarsely chopped walnuts
2 pounds (900 g) tart cooking apples, peeled, cored and cut into ¼ inch-thick slices (use apples that hold their shape during baking)
1. Mix the rum and raisins in a bowl. Mix the cinnamon and sugar in another bowl.
2. Heat 3 tablespoons of the butter in a large skillet over medium-high. Add the breadcrumbs and cook whilst stirring until golden and toasted. This will take about 3 minutes. Let it cool completely.
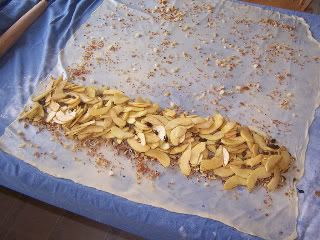
3. Put the rack in the upper third of the oven and preheat the oven to 400°F (200°C). Line a large baking sheet with baking paper (parchment paper). Make the strudel dough as described below. Spread about 3 tablespoons of the remaining melted butter over the dough using your hands (a bristle brush could tear the dough, you could use a special feather pastry brush instead of your hands). Sprinkle the buttered dough with the bread crumbs. Spread the walnuts about 3 inches (8 cm) from the short edge of the dough in a 6-inch-(15cm)-wide strip. Mix the apples with the raisins (including the rum), and the cinnamon sugar. Spread the mixture over the walnuts.
4. Fold the short end of the dough onto the filling. Lift the tablecloth at the short end of the dough so that the strudel rolls onto itself. Transfer the strudel to the prepared baking sheet by lifting it. Curve it into a horseshoe to fit. Tuck the ends under the strudel. Brush the top with the remaining melted butter.
5. Bake the strudel for about 30 minutes or until it is deep golden brown. Cool for at least 30 minutes before slicing. Use a serrated knife and serve either warm or at room temperature. It is best on the day it is baked.
Strudel dough
from “Kaffeehaus – Exquisite Desserts from the Classic Cafés of Vienna, Budapest and Prague” by Rick Rodgers
1 1/3 cups (200 g) unbleached flour
1/8 teaspoon salt
7 tablespoons (105 ml) water, plus more if needed
2 tablespoons (30 ml) vegetable oil, plus additional for coating the dough
1/2 teaspoon cider vinegar
1. Combine the flour and salt in a stand-mixer fitted with the paddle attachment. Mix the water, oil and vinegar in a measuring cup. Add the water/oil mixture to the flour with the mixer on low speed. You will get a soft dough. Make sure it is not too dry, add a little more water if necessary.
Take the dough out of the mixer. Change to the dough hook. Put the dough ball back in the mixer. Let the dough knead on medium until you get a soft dough ball with a somewhat rough surface.
2. Take the dough out of the mixer and continue kneading by hand on an unfloured work surface. Knead for about 2 minutes. Pick up the dough and throw it down hard onto your working surface occasionally.
Shape the dough into a ball and transfer it to a plate. Oil the top of the dough ball lightly. Cover the ball tightly with plastic wrap. Allow to stand for 30-90 minutes (longer is better).
3. It would be best if you have a work area that you can walk around on all sides like a 36 inch (90 cm) round table or a work surface of 23 x 38 inches (60 x 100 cm). Cover your working area with table cloth, dust it with flour and rub it into the fabric. Put your dough ball in the middle and roll it out as much as you can.
Pick the dough up by holding it by an edge. This way the weight of the dough and gravity can help stretching it as it hangs. Using the back of your hands to gently stretch and pull the dough. You can use your forearms to support it.
4. The dough will become too large to hold. Put it on your work surface. Leave the thicker edge of the dough to hang over the edge of the table. Place your hands underneath the dough and stretch and pull the dough thinner using the backs of your hands. Stretch and pull the dough until it's about 2 feet (60 cm) wide and 3 feet (90 cm) long, it will be tissue-thin by this time. Cut away the thick dough around the edges with scissors. The dough is now ready to be filled.
Tips
- Ingredients are cheap so we would recommend making a double batch of the dough, that way you can practice the pulling and stretching of the dough with the first batch and if it doesn't come out like it should you can use the second batch to give it another try;
- The tablecloth can be cotton or polyster;
- Before pulling and stretching the dough, remove your jewelry from hands and wrists, and wear short-sleeves;
- To make it easier to pull the dough, you can use your hip to secure the dough against the edge of the table;
- Few small holes in the dough is not a problem as the dough will be rolled, making (most of) the holes invisible.
Friday, May 15, 2009
The first ever Daring Cooks' Challenge: Ricotta Gnocchi
When the creators of Daring Bakers started a cooking challenge group, I decided to join. I like cooking better than baking anyway.
This first challenge was something I've never done. I've never tried ricotta gnocchi, but I like potato gnocchi well enough. Well, I did not like this recipe. I let my cheese drain for almost 2 days but it was still too wet. Half of my gnocchi were made exactly as written. I added flour to the other half and it turned out so much better. Matt said he felt sick after eating it (he got more of the "original" gnocchi than I did.
I made a creamy red sauce with sausage to go with it. I'll never make this again.
Zuni Ricotta Gnocchi
Source: From The Zuni Café Cookbook.
Yield: Makes 40 to 48 gnocchi (serves 4 to 6)
Prep time: Step 1 will take 24 hours. Steps 2 through 4 will take approximately 1 hour.
Tips:
- If you can find it, use fresh ricotta. As Judy Rodgers advises in her recipe, there is no substitute for fresh ricotta. It may be a bit more expensive, but it's worth it.
- Do not skip the draining step. Even if the fresh ricotta doesn't look very wet, it is. Draining the ricotta will help your gnocchi tremendously.
- When shaping your gnocchi, resist the urge to over handle them. It's okay if they look a bit wrinkled or if they're not perfectly smooth.
- If you're not freezing the gnocchi for later, cook them as soon as you can. If you let them sit around too long they may become a bit sticky.
- For the variations to the challenge recipe, please see the end of the recipe.
Equipment required:
- Sieve
- Cheesecloth or paper towels
- Large mixing bowl
- Rubber spatula
- Tablespoon
- Baking dish or baking sheet
- Wax or parchment paper
- Small pot
- Large skillet
- Large pan or pot (very wide in diameter and at least 2 inches deep)
For the gnocchi:
1 pound (454 grams/16 ounces) fresh ricotta (2 cups)
2 large cold eggs, lightly beaten
1 tablespoon (1/2 ounce) unsalted butter
2 or 3 fresh sage leaves, or a few pinches of freshly grated nutmeg, or a few pinches of chopped lemon zest (all optional)
½ ounce Parmigiano-Reggiano, grated (about ¼ cup very lightly packed)
about ¼ teaspoon salt (a little more if using kosher salt)
all-purpose flour for forming the gnocchi
Step 1
If the ricotta is too wet, your gnocchi will not form properly. In her cookbook, Judy Rodgers recommends checking the ricotta’s wetness. To test the ricotta, take a teaspoon or so and place it on a paper towel. If you notice a very large ring of dampness forming around the ricotta after a minute or so, then the ricotta is too wet. To remove some of the moisture, line a sieve with cheesecloth or paper towels and place the ricotta in the sieve. Cover it and let it drain for at least 8 hours and up to 24 hours in the refrigerator. Alternatively, you can wrap the ricotta carefully in cheesecloth (2 layers) and suspend it in your refrigerator for 8 to 24 hours with a bowl underneath to catch the water that’s released. Either way, it’s recommended that you do this step the day before you plan on making the gnocchi.
Step 2 (the day you plan on eating the gnocchi): Making the gnocchi dough.
To make great gnocchi, the ricotta has to be fairly smooth. Place the drained ricotta in a large bowl and mash it as best as you can with a rubber spatula or a large spoon (it’s best to use a utensil with some flexibility here). As you mash the ricotta, if you noticed that you can still see curds, then press the ricotta through a strainer to smooth it out as much as possible.
Add the lightly beaten eggs to the mashed ricotta.
Melt the tablespoon of butter. As it melts, add in the sage if you’re using it. If not, just melt the butter and add it to the ricotta mixture.
Add in any flavouring that you’re using (i.e., nutmeg, lemon zest, etc.). If you’re not using any particular flavouring, that’s fine.
Add the Parmigiano-Reggiano and the salt.
Beat all the ingredients together very well. You should end up with a soft and fluffy batter with no streaks (everything should be mixed in very well).
Step 3: Forming the gnocchi.
Fill a small pot with water and bring to a boil. When it boils, salt the water generously and keep it at a simmer. You will use this water to test the first gnocchi that you make to ensure that it holds together and that your gnocchi batter isn’t too damp.
In a large, shallow baking dish or on a sheet pan, make a bed of all-purpose flour that’s ½ an inch deep.
With a spatula, scrape the ricotta mixture away from the sides of the bowl and form a large mass in the centre of your bowl.
Using a tablespoon, scoop up about 2 to 3 teaspoons of batter and then holding the spoon at an angle, use your finger tip to gently push the ball of dough from the spoon into the bed of flour.
At this point you can either shake the dish or pan gently to ensure that the flour covers the gnocchi or use your fingers to very gently dust the gnocchi with flour. Gently pick up the gnocchi and cradle it in your hand rolling it to form it in an oval as best as you can, at no point should you squeeze it. What you’re looking for is an oval lump of sorts that’s dusted in flour and plump.
Gently place your gnocchi in the simmering water. It will sink and then bob to the top. From the time that it bobs to the surface, you want to cook the gnocchi until it’s just firm. This could take 3 to 5 minutes.
If your gnocchi begins to fall apart, this means that the ricotta cheese was probably still too wet. You can remedy this by beating a teaspoon of egg white into your gnocchi batter. If your gnocchi batter was fluffy but the sample comes out heavy, add a teaspoon of beaten egg to the batter and beat that in. Test a second gnocchi to ensure success.
Form the rest of your gnocchi. You can put 4 to 6 gnocchi in the bed of flour at a time. But don’t overcrowd your bed of flour or you may damage your gnocchi as you coat them.
Have a sheet pan ready to rest the formed gnocchi on. Line the sheet pan with wax or parchment paper and dust it with flour.
You can cook the gnocchi right away, however, Judy Rodgers recommends storing them in the refrigerator for an hour prior to cooking to allow them to firm up.
Step 4: Cooking the gnocchi.
Have a large skillet ready to go. Place the butter and water for the sauce in the skillet and set aside.
In the largest pan or pot that you have (make sure it’s wide), bring at least 2 quarts of water to a boil (you can use as much as 3 quarts of water if your pot permits). You need a wide pot or pan so that your gnocchi won’t bump into each other and damage each other.
Once the water is boiling, salt it generously.
Drop the gnocchi into the water one by one. Once they float to the top, cook them for 3 to 5 minutes (as in the case with the test gnocchi).
When the gnocchi float to the top, you can start your sauce while you wait for them to finish cooking.
Place the skillet over medium heat and melt the butter. Swirl it gently a few times as it melts. As soon as it melts and is incorporated with the water, turn off the heat. Your gnocchi should be cooked by now.


Monday, April 27, 2009
April Daring Baker Challenge: Cheesecake
The April 2009 challenge is hosted by Jenny from Jenny Bakes. She has chosen Abbey's Infamous Cheesecake as the challenge.
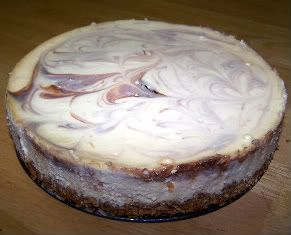
I love cheesecake and I loved this challenge. After my less than impressive Valentine's Cheesecake this year, I was happy to have a chance to redeem myself. This basic cheesecake recipe was quite divine. A keeper for sure.
I made mine in a spring form pan. To keep the water from seeping in, I first wrapped it in saran wrap about half way up (I promise, it didn't melt). I then used two layers of heavy duty foil. One piece is big enough to cover the whole pan, but I used two just in case of a leak or puncture. It worked beautifully and this was the absolute BEST attempt I've had at making cheesecake. It was silky smooth.
Other tips I've picked up over the years:
- MAKE SURE YOUR CREAM CHEESE IS AT ROOM TEMP!!!! Honestly, do not skip that step. Otherwise you'll have a lumpy cheesecake that you'll probably over beat to compensate. That will then make your cheesecake puff up and crack. Not a pretty or tasty thing. (This is what I did wrong this year on V-day, so I'm speaking from experience.)
- I've had better luck using an electric hand beater as opposed to my kitchenaid. I can control the mixing a little better and thus beat it less.
- Don't overbeat the mixture or it will puff up and crack while baking.
Instead of using the crust recipe provided, I made a peanut butter-pretzel crust and LOVED it. I got the recipe here but reduced the oil by a 2 TBSP. So my crust recipe was as follows:
Peanut-butter pretzel crust
2 cups of pretzel crumbs
1 Tbsp. sugar
1/4 cup extra light olive oil
3 Tbsp. natural (salted) peanut butter
Start with a clean food processor and make the pretzel crumbs by whizzing the pretzels in there for a while. Add the remaining crust ingredients right in there and pulse until it starts to clump together slightly. The little bit of PB with the pretzels tastes like a Butterfinger bar.
Abbey's Infamous Cheesecake:
crust: (didn't use this recipe, so I can't vouch for this crust)
2 cups / 180 g graham cracker crumbs
1 stick / 4 oz butter, melted
2 tbsp. / 24 g sugar
1 tsp. vanilla extract
cheesecake: (awesome!!! my new basic cheesecake recipe!)
3 sticks of cream cheese, 8 oz each (total of 24 oz) room temperature
1 cup / 210 g sugar
3 large eggs
1 cup / 8 oz heavy cream
1 tbsp. lemon juice
1 tbsp. vanilla extract (or the innards of a vanilla bean)
1 tbsp liqueur, optional, but choose what will work well with your cheesecake (I used no liqueur)
*My variation on this was a nutella marbled cheesecake. I took out 1 cup of batter and mixed it with 3/4 of a small bottle of nutella. I then put a layer of regular cheesecake batter on top of the crust, then the nutella batter mixture, then another regular layer. I used a chopstick to swirll the batter together.
DIRECTIONS:
1. Preheat oven to 350 degrees F (Gas Mark 4 = 180C = Moderate heat). Begin to boil a large pot of water for the water bath.
2. Mix together the crust ingredients and press into your preferred pan. You can press the crust just into the bottom, or up the sides of the pan too - baker's choice. Set crust aside.
3. Combine cream cheese and sugar in the bowl of a stand-mixer (or in a large bowl if using a hand-mixer) and cream together until smooth. Add eggs, one at a time, fully incorporating each before adding the next. Make sure to scrape down the bowl in between each egg. Add heavy cream, vanilla, lemon juice, and alcohol and blend until smooth and creamy.
4. Pour batter into prepared crust and tap the pan on the counter a few times to bring all air bubbles to the surface. Place pan into a larger pan and pour boiling water into the larger pan until halfway up the side of the cheesecake pan. If cheesecake pan is not airtight, cover bottom securely with foil before adding water.
5. Bake 45 to 55 minutes, until it is almost done - this can be hard to judge, but you're looking for the cake to hold together, but still have a lot of jiggle to it in the center. You don't want it to be completely firm at this stage. Close the oven door, turn the heat off, and let rest in the cooling oven for one hour. This lets the cake finish cooking and cool down gently enough so that it won't crack on the top. After one hour, remove cheesecake from oven and lift carefully out of water bath. Let it finish cooling on the counter, and then cover and put in the fridge to chill. Once fully chilled, it is ready to serve.
Pan note: The creator of this recipe used to use a springform pan, but no matter how well she wrapped the thing in tin foil, water would always seep in and make the crust soggy. Now she uses one of those 1-use foil "casserole" shaped pans from the grocery store. They're 8 or 9 inches wide and really deep, and best of all, water-tight. When it comes time to serve, just cut the foil away.
Prep notes: While the actual making of this cheesecake is a minimal time commitment, it does need to bake for almost an hour, cool in the oven for an hour, and chill overnight before it is served. Please plan accordingly!
_______________________________________________
I also made a german chocolate frosting for the top, but it made it way too sweet and really overpowered the cheesecake. It was WAY better without it. But here's a picture anyway.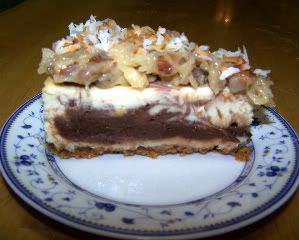
Friday, March 27, 2009
March DB Challenege: Lasagne of Emilia-Romagna
The March 2009 challenge is hosted by Mary of Beans and Caviar, Melinda of Melbourne Larder and Enza of Io Da Grande. They have chosen Lasagne of Emilia-Romagna from The Splendid Table by Lynne Rossetto Kasper as the challenge.
This was one of the more time consuming challenges, but I won't lie, it was probably my favorite result yet. Homemade pasta. Homemade Ragu. Homemade Bechamel. Put them all together and it was homemade deliciousness.


This was one of the more time consuming challenges, but I won't lie, it was probably my favorite result yet. Homemade pasta. Homemade Ragu. Homemade Bechamel. Put them all together and it was homemade deliciousness.


Before I give the recipes, know this:
After chopping the spinach I didn't see how it could be humanly possible to get all the spinach in if it was uncooked. So I cooked it, squeezed it dry and then mixed it with the egg. The egg amount seems like it has to be wrong, though. The "more than 60 grams" threw me since 1 large egg was 57 grams. I ended up using 6 large eggs for the entire amount of flour. I could have probably used less and added a little water and oil. I did use semolina flour instead of AP flour. I figured if I was going to spend the time I might as well do it properly...I am not new to kneading stuff by hand, but to get this elastic enough I knew I couldn't do it by hand after about 5 min. of trying. I threw it in my kitchen aid with the dough hook. I had to hold the bowl down because it made it go a little crazy, but it really worked out nicely.
The pasta rolling by hand was absolutely ridiculous. I will never attempt that again. It took me 1 1/2 hours just to roll. I would say I got it to the proper thinness, so it is possible. However it will be pasta machine or bust if I do this again.
I didn't really have anything to dry it on, so I used cookie cooling racks. Bad idea. Every point it touched a metal point it was much more likely to crack after drying. Hanging over a broom handle would have been better. Guess I'll just have to wash mine next time.
The ragu given with the challenge was really quite amazing as written. The browning tip helped a ton. I didn't add any salt (unheard of for me, however my broth was probably extra salty...) or pepper (also unheard of). I did have to use an immersion blender to get the stewed tomatoes as small as I like them. Not a fan of big chunks of tomato. The bechamel sauce was great also, but I used almost a full recipe for a half lasagna. So, if I were to make a full lasagna I would double that recipe. I even bought fresh nutmeg for it and that was a fun, new experience! I just used the small side of my cheese grater.Overall very flavorful and "restaurant tasting" according to my husband. We didn't miss ricotta one bit in this.
Lasagne of Emilia-Romagna (Lasagne Verdi al Forno)
(Serves 8 to 10 as a first course, 6 to 8 as a main dish)
Preparation Time: 15 minutes to assemble and 40 minutes cooking time
10 quarts (9 litres) salted water
1 recipe Spinach Pasta cut for lasagna (recipe follows)#1
1 recipe Bechamel Sauce (recipe follows)#2
1 recipe Country Style Ragu (recipe follows)#3
1 cup (4 ounces/125g) freshly grated Parmigiano-Reggiano
Method
Working Ahead:
The ragu and the béchamel sauce can be made up to three days ahead. The ragu can also be frozen for up to one month. The pasta can be rolled out, cut and dried up to 24 hours before cooking. The assembled lasagne can wait at room temperature (20 degrees Celsius/68 degrees Fahrenheit) about 1 hour before baking. Do not refrigerate it before baking, as the topping of béchamel and cheese will overcook by the time the center is hot.
Assembling the Ingredients:
Have all the sauces, rewarmed gently over a medium heat, and the pasta at hand. Have a large perforated skimmer and a large bowl of cold water next to the stove. Spread a double thickness of paper towels over a large counter space. Preheat the oven to 350 degrees Fahrenheit (180 degrees Celsius). Oil or butter a 3 quart (approx 3 litre) shallow baking dish.
Cooking the Pasta:
Bring the salted water to a boil. Drop about four pieces of pasta in the water at a time. Cook about 2 minutes. If you are using dried pasta, cook about 4 minutes, taste, and cook longer if necessary. The pasta will continue cooking during baking, so make sure it is only barely tender. Lift the lasagne from the water with a skimmer, drain, and then slip into the bowl of cold water to stop cooking. When cool, lift out and dry on the paper towels. Repeat until all the pasta is cooked.
Assembling the Lasagne:
Spread a thin layer of béchamel over the bottom of the baking dish. Arrange a layer of about four overlapping sheets of pasta over the béchamel. Spread a thin layer of béchamel (about 3 or 4 spoonfuls) over the pasta, and then an equally thin layer of the ragu. Sprinkle with about 1&1/2 tablespoons of the béchamel and about 1/3 cup of the cheese. Repeat the layers until all ingredients are used, finishing with béchamel sauce and topping with a generous dusting of cheese.
Baking and Serving the Lasagne:
Cover the baking dish lightly with foil, taking care not to let it touch the top of the lasagne. Bake 40 minutes, or until almost heated through. Remove the foil and bake another 10 minutes, or until hot in the center (test by inserting a knife – if it comes out very warm, the dish is ready). Take care not to brown the cheese topping. It should be melted, creamy looking and barely tinged with a little gold. Turn off the oven, leave the door ajar and let the lasagne rest for about 10 minutes. Then serve. This is not a solid lasagne, but a moist one that slips a bit when it is cut and served.
#1 Spinach Egg Pasta (Pasta Verde)
Preparation: 45 minutes
Makes enough for 6 to 8 first course servings or 4 to 6 main course servings, equivalent to 1 pound (450g) dried boxed pasta.
2 jumbo eggs (2 ounces/60g or more)
10 ounces (300g) fresh spinach, rinsed dry, and finely chopped; or 6 ounces (170g) frozen chopped spinach, defrosted and squeezed dry
3&1/2 cups (14 ounces/400g) all purpose unbleached (plain) flour (organic stone ground preferred)
Working by Hand:
Equipment
A roomy work surface, 24 to 30 inches deep by 30 to 36 inches (60cm to 77cm deep by 60cm to 92cm). Any smooth surface will do, but marble cools dough slightly, making it less flexible than desired.
A pastry scraper and a small wooden spoon for blending the dough.
A wooden dowel-style rolling pin. In Italy, pasta makers use one about 35 inches long and 2 inches thick (89cm long and 5cm thick). The shorter American-style pin with handles at either end can be used, but the longer it is, the easier it is to roll the pasta.
Note: although it is not traditional, Enza has successfully made pasta with a marble rolling pin, and this can be substituted for the wooden pin, if you have one.
Plastic wrap to wrap the resting dough and to cover rolled-out pasta waiting to be filled. It protects the pasta from drying out too quickly.
A sharp chef’s knife for cutting pasta sheets.
Cloth-covered chair backs, broom handles, or specially designed pasta racks found in cookware shops for draping the pasta.
Mixing the dough:
Mound the flour in the center of your work surface and make a well in the middle. Add the eggs and spinach. Use a wooden spoon to beat together the eggs and spinach. Then gradually start incorporating shallow scrapings of flour from the sides of the well into the liquid. As you work more and more flour into the liquid, the well’s sides may collapse. Use a pastry scraper to keep the liquids from running off and to incorporate the last bits of flour into the dough. Don’t worry if it looks like a hopelessly rough and messy lump.
Kneading:
With the aid of the scraper to scoop up unruly pieces, start kneading the dough. Once it becomes a cohesive mass, use the scraper to remove any bits of hard flour on the work surface – these will make the dough lumpy. Knead the dough for about 3 minutes. Its consistency should be elastic and a little sticky. If it is too sticky to move easily, knead in a few more tablespoons of flour. Continue kneading about 10 minutes, or until the dough has become satiny, smooth, and very elastic. It will feel alive under your hands. Do not shortcut this step. Wrap the dough in plastic wrap, and let it relax at room temperature 30 minutes to 3 hours.
Stretching and Thinning:
If using an extra-long rolling pin work with half the dough at a time. With a regular-length rolling pin, roll out a quarter of the dough at a time and keep the rest of the dough wrapped. Lightly sprinkle a large work surface with flour. The idea is to stretch the dough rather than press down and push it. Shape it into a ball and begin rolling out to form a circle, frequently turning the disc of dough a quarter turn. As it thins outs, start rolling the disc back on the pin a quarter of the way toward the center and stretching it gently sideways by running the palms of your hands over the rolled-up dough from the center of the pin outward. Unroll, turn the disc a quarter turn, and repeat. Do twice more.
Stretch and even out the center of the disc by rolling the dough a quarter of the way back on the pin. Then gently push the rolling pin away from you with one hand while holding the sheet in place on the work surface with the other hand. Repeat three more times, turning the dough a quarter turn each time.
Repeat the two processes as the disc becomes larger and thinner. The goal is a sheet of even thickness. For lasagne, the sheet should be so thin that you can clearly see your hand through it and see colours. Cut into rectangles about 4 by 8 inches (10 x 20 cm). Note: Enza says that transparency is a crucial element of lasagne pasta and the dough should be rolled as thinly as possible. She says this is why her housekeeper has such strong arms!
Dry the pasta at room temperature and store in a sealed container or bag.
#2 Bechamel
Preparation Time: 15 minutes
4 tablespoons (2 ounces/60g) unsalted butter
4 tablespoons (2 ounces/60g) all purpose unbleached (plain) flour, organic stone ground preferred
2&2/3 cups (approx 570ml) milk
Salt and freshly ground pepper to taste
Freshly grated nutmeg to taste
Using a medium-sized saucepan, melt the butter over low to medium heat. Sift over the flour, whisk until smooth, and then stir (without stopping) for about 3 minutes. Whisk in the milk a little at a time and keep the mixture smooth. Bring to a slow simmer, and stir 3 to 4 minutes, or until the sauce thickens. Cook, stirring, for about 5 minutes, until the sauce thickens. Season with salt, pepper, and a hint of nutmeg.
#3 Country Style Ragu’ (Ragu alla Contadina)
Preparation Time: Ingredient Preparation Time 30 minutes and Cooking time 2 hours
Makes enough sauce for 1 recipe fresh pasta or 1 pound/450g dried pasta)
3 tablespoons extra virgin olive oil (45 mL)
2 ounces/60g pancetta, finely chopped
1 medium onion, minced
1 medium stalk celery with leaves, minced
1 small carrot, minced
4 ounces/125g boneless veal shoulder or round
4 ounces/125g pork loin, trimmed of fat, or 4 ounces/125g mild Italian sausage (made without fennel)
8 ounces/250g beef skirt steak, hanging tender, or boneless chuck blade or chuck center cut (in order of preference)
1 ounce/30g thinly sliced Prosciutto di Parma
2/3 cup (5 ounces/160ml) dry red wine
1 &1/2 cups (12 ounces/375ml) chicken or beef stock (homemade if possible)
2 cups (16 ounces/500ml) milk
3 canned plum tomatoes, drained
Salt and freshly ground black pepper to taste
Working Ahead:
The ragu can be made 3 days ahead. Cover and refrigerate. It also freezes well for up to 1 month. Skim the fat from the ragu’ before using it.
Browning the Ragu Base:
Heat the olive oil in a 12 inch (30cm) skillet (frying pan) over medium-high heat. Have a large saucepan handy to use once browning is complete. Add the pancetta and minced vegetables and sauté, stirring frequently with a wooden spoon, 10 minutes, or until the onions barely begin to color. Coarsely grind all the meats together, including the prosciutto, in a food processor or meat grinder. Stir into the pan and slowly brown over medium heat. First the meats will give off a liquid and turn dull grey but, as the liquid evaporates, browning will begin. Stir often, scooping under the meats with the wooden spatula. Protect the brown glaze forming on the bottom of the pan by turning the heat down. Cook 15 minutes, or until the meats are a deep brown. Turn the contents of the skillet into a strainer and shake out the fat. Turn them into the saucepan and set over medium heat.
Reducing and Simmering: Add the wine to the skillet, lowering the heat so the sauce bubbles quietly. Stir occasionally until the wine has reduced by half, about 3 minutes. Scrape up the brown glaze as the wine bubbles. Then pour the reduced wine into the saucepan and set the skillet aside.
Stir ½ cup stock into the saucepan and let it bubble slowly, 10 minutes, or until totally evaporated. Repeat with another ½ cup stock. Stir in the last 1/2 cup stock along with the milk. Adjust heat so the liquid bubbles very slowly. Partially cover the pot, and cook 1 hour. Stir frequently to check for sticking.
Add the tomatoes, crushing them as they go into the pot. Cook uncovered, at a very slow bubble for another 45 minutes, or until the sauce resembles a thick, meaty stew. Season with salt and pepper.
Sunday, March 1, 2009
February Daring Baker's Challenege:
The February 2009 challenge is hosted by Wendy of WMPE's blog and Dharm of Dad ~ Baker & Chef. We have chosen a Chocolate Valentino cake by Chef Wan; a Vanilla Ice Cream recipe from Dharm and a Vanilla Ice Cream recipe from Wendy as the challenge.
Feb. is just too short and I totally spaced getting this up by yesterday! I actually made it way back at Valentine's Day.
Chocolate Valentino
Preparation Time: 20 minutes
16 ounces (1 pound) (454 grams) of semisweet chocolate, roughly chopped
½ cup (1 stick) plus 2 tablespoons (146 grams total) of unsalted butter
5 large eggs separated
1. Put chocolate and butter in a heatproof bowl and set over a pan of simmering water (the bottom of the bowl should not touch the water) and melt, stirring often.
2. While your chocolate butter mixture is cooling. Butter your pan and line with a parchment circle then butter the parchment.
3. Separate the egg yolks from the egg whites and put into two medium/large bowls.
4. Whip the egg whites in a medium/large grease free bowl until stiff peaks are formed (do not over-whip or the cake will be dry).
5. With the same beater beat the egg yolks together.
6. Add the egg yolks to the cooled chocolate.
7. Fold in 1/3 of the egg whites into the chocolate mixture and follow with remaining 2/3rds. Fold until no white remains without deflating the batter. {link of folding demonstration}
8. Pour batter into prepared pan, the batter should fill the pan 3/4 of the way full, and bake at 375F/190C
9. Bake for 25 minutes until an instant read thermometer reads 140F/60C.
Note – If you do not have an instant read thermometer, the top of the cake will look similar to a brownie and a cake tester will appear wet.
10. Cool cake on a rack for 10 minutes then unmold.
--------------------------------------
I used a mixture or semi-sweet and milk. The consistency of the cake wasn't even, but it all tasted good. I think I didn't fold in my egg whites quite right. But overall I call it a success. We ended up eating the whole thing.

Normally for V. Day I make a cheesecake, so I just incorporated that into the challenge. I made a custard ice cream base using my kitchen aid recipe, I added strawberries I'd mixed with sugar and smashed, and then I chunked up the cheesecake and put it in at the very end. It turned out to be pleasing.
Tuesday, February 3, 2009
Pie crust
Pie Crust:The best (and easiest) homemade recipe I've tried to date
*This recipie makes enough crust for 3 pies. I freeze the leftover flattened into a disk, wrapped in wax paper and use it later.*
5 cups flour
2 cups shortening
1 TBSP white vinegar
1 cup water
1 egg, beaten
1 1/2 tsp. salt (kosher if possible)
Combine flour and shortening with a pastry blender or two knives until it resembles coarse crumbs. Mix together, vinegar, water, and egg then add to flour mixture. Mix until just blended. Roll out between two sheets of waxed paper then place in pie pan. Be sure to poke holes in bottom of crust.
*Note: twice I made this I didn't quite use all of my liquid. Once I used it all. I think it depends on how big the egg is that you use...*Sunday, February 1, 2009
Alton Brown's Biscuits
I have tried lots biscuit recipes with lots of failures. This is my favorite at the moment. The original recipe is here. The best, though is the kneading tip from his show that's not on his recipe. You always hear "don't over mix the dough!" but I never really knew how much was too much. I often didn't mix mine enough so they turned out crumbly. His suggestion helped out. It has amazing texture and my only minor complaint is that it has a very slight baking powder taste. They're still the best yet though.
Alton Brown's Southern Biscuits: makes about 12
2 C. flour
4 tsp baking powder
1/4 tsp baking soda
3/4 tsp kosher salt
2 Tbsp butter
2 Tbsp shortening
1 C. chilled buttermilk (or 1 C regular milk mixed with 2 tsp. white vinegar works fine too)
Directions
1. Preheat the oven to 450*
2. Mix all of the dry ingredients together. Add butter and shortening and cut in with knives, forks, or a pastry cutter. You can use your fingers too if you want.
3. Make a well in the center and pour in the buttermilk.
4. Stir the wet and dry ingredients until they just come together. It will be sticky.
5. Turn the dough onto a lightly floured surface and knead 10 times by folding it on itself. (His tip from the show.)
6. Press into a 1 in. thick round and cut out with a 2 in. cup or cutter. (just reform the scraps and cut until you've used everything)
7. Place biscuits on a sheet so they just touch and cook at 450* for 15-20 min. or the tops are lightly golden brown. (I've had best results with the air cushioned pans used for cookies.)
My mom's peanut butter granola
This was my favorite granola growing up, but I still need to make it as an adult. I got my mom's recipe awhile back, so I'm posting it now for myself and siblings.
Peanut butter granola: makes 14 (1/2 C.) servings
4 Tbsp oil
2/3 C. peanut butter
1 C. brown sugar
5 C. old fashioned oats
1 C. raisens
Stir oil into peanut butter. Stir in brown sugar. Add oats and stir until coated. Bake at 300* for 15 min. stirring occasionally. Add raisins when cool.
This is not a crunchy or low fat granola. It is very delicious though.
Puffy Oven Pancakes
A.k.a Hootinanny, German Pancakes, Dutch baby
This was a favorite growing up and I still love them. It's a tradition (since college) to make them for one of the mornings of LDS general conference in both April and October. We generally cut the 9X13 pan into 4ths for adults, but kids won't need a piece that big.
Puffy Oven Pancakes:
6 eggs
1 C. flour
1 C. milk
1/2 tsp. salt
1 cube butter cut into pieces
1. Put the butter in a 9X13 (I use glass) pan and put into a cold oven. Let the pan heat up as the oven is preheating to 400*. Make sure the butter doesn't burn, but it is imperative that the pan is hot when you put the batter in.
2. Mix the eggs, flour, milk and salt together.
3. Pour the batter into the hot pan and cook for about 18-20 min. It will be big and puffy right out of the oven but will deflate as it cools off. Eat with syrup, jam, fruit, applesauce, powdered sugar, or any other favorite topping.
Basic Granola
I got this here but modified it..
Basic Granola (about 5-6 cups)
3 C. oats
1/2 C. chopped nuts (I use a mix of pecans and almonds)
1/2 C. coconut
1/2 C. wheat germ or oat bran or flax seed
1/2 C. brown sugar
1/2 C. oil
1/2 C. honey
1/2 tsp. vanilla
1 C. dried fruit like raisins or craisins
pinch of kosher salt
1. Preheat oven to 325* and line a heavy cookie sheet. I use my silpat.
2. I mix the sugar, oil, honey and vanilla together in a bowl and add the rest of the ingredients (minus the dried fruit). Spread it evenly on the cooking sheet.
3. Bake at 325* for 12 min. Stir and bake for 12 min. more. It won't be crunchy straight out of the oven. It has to sit and cool to get crunchy! Don't over bake it or it will burn.
4. Add dried fruit and let cool. Store in an airtight container.
Buttermilk Pancakes
I don't know where I got this recipe. I've had it for years and love it, so sorry I can't give them proper kudos.
Buttermilk Pancakes
3 C flour
3 Tbsp granulated sugar
3 tsp. baking powder
1 ½ tsp. baking soda
¾ tsp. salt
3 C FRESH buttermilk (not powdered)
½ C milk
3 eggs
1/3 C butter, melted
Combine all dry & wet separately. Mix wet into dry. Don't over mix. After all the dry is incorporated and looks like lumpy mashed potatoes, stop there and cook up on a griddle.
Chicken Taco Soup
Chicken Taco soup- Serves 4-6
1-2 breast chicken—boil to shred (I use 1)
1-2 cans pinto and/or black beans, drained and rinsed
Corn or diced green peppers or other veggies that would work well…
½ can Mexican style diced tomatoes *optional*
4-6 cups water + 4 tsp better than bullion (or 4 cups broth)
little lime juice
2 cloves garlic
½ Onion diced
to taste:
Chili powder
Cumin
Jalapeno salt (jalapeno salt is just if you want some heat. I've only seen it sold here in TX though)
Cayenne
Saute the onion and any other hard veggies in a little oil in the bottom of the soup pan. When mostly tender, add everything else and heat. Season as you like with the chili powder, cumin, jalapeno salt, and/or cayenne. You can also use ranch style beans in place of the black or pinto to cut down on the seasoning you need. If that's the case, don't rinse and drain them.
Easy Beans and Rice
This is one of my all time favorite way to make beans into a main dish. I originally got this recipe from Foxyj, but I modified it slightly to make it more of a main dish rather than a side dish. The only real difference is that I halve everything except the beans. Even halving her recipe, this still makes enough for 4 adult sized servings.
Easy Beans and Rice (Serves 4 adults)
1/4 onion, chopped
1-2 cloves garlic, minced
1/2 Tbsp oil
1/2 cup long grain rice
1/4 tsp. cayenne pepper (approximate, or add some hot sauce if you have it)
1 cup chicken broth (If you need it vegetarian, just use vegetable broth)
1 can black beans, drained (I've also used Pinto, and I bet Goya pink beans would be good too)
Saute the onion and garlic over medium heat for a few minutes in the oil until soft. Add the rice and stir around for a minute or two so it gets nice and toasted (it will turn white). Add the broth, cayenne, and black beans to the pan. Bring to a boil, then turn down heat, cover, and simmer for about 20-30 minutes until the rice is cooked and fluffy. (I think mine usually takes about 30 min., but check it at 20 and see how it's going...)
To turn it into burritos:
4 Large Burrito sized flour tortillas
any accompaniment you like with Mexican food
Sometimes I add seasoned shredded pork or chicken. I've also cubed up and sauteed some zucchini and seasoned it with chili powder, garlic salt and cumin and added it for vegetarian burritos. It works nicely and gives it a little more body than just the beans and rice. Grilled or caramelized onions are good in it too. As a standard, I'll usually have guacamole, sour cream, and cheese inside the burrito with the bean and rice mixture. It's so delicious.
Easy Black Bean Salsa
 Black Bean Salsa
1 can black beans, drained and rinsed (get a good brand so they're soft right out of the can)
2-3 roma tomatoes (or 1 larger tomato), seeded and diced
1/4 small red onion, finely diced
1-2 avocados, diced
handful cilantro, washed and coarsely chopped
1 lime's worth of juice
a splash of white vinegar (trust me, it works nicely with the lime)
1-2 cloves garlic
celery salt (use it if you have it! It REALLY helps bring all the flavors together), cumin, and garlic salt to taste
Mix all together and eat with chips or on top of tilapia or any other way you like your black bean salsa! Yuuummm...
--------------------
Now, just so you know, we've made a lot of pico de gallo and fresh salsa and we've found that the addition of vinegar and celery salt take it to a whole new level of deliciousness. I don't know why, but they just make it better. I think it really helped for this one too, since Matt usually doesn't love black bean salsa and he said after tasting this, "This is some GREAT salsa." His only comment was that it could have used more avocado. I only had one in there, so we'll try 2 next time.
Thursday, January 29, 2009
January Daring Baker: Tuiles
This month's challenge is brought to us by Karen of Bake My Day and Zorra of 1x umruehren bitte aka Kochtopf. They have chosen Tuiles from The Chocolate Book by Angélique Schmeink and Nougatine and Chocolate Tuiles from Michel Roux.
-----------------------------------------------------------------------------------------
It's 10pm on the post day and I'm still in the process of getting mine together. I made the dough last night, but Dean took next to no nap today and I had book club tonight. Yes, I know, I put this off to the end so there's no excuse. I honestly was not happy about this challenge. After the holidays I did not want something sweet. Sure this had a savory option, but it just felt like a lame cracker challenge. I wanted something savory, bready, yeasty, salty, SOMETHING other than sweet/cracker. But whatever. Maybe that's just the pregnant lady in my talking.
Ok. Now that I'm finished and I've eaten them, I have to say this was a decent recipe. It made me think of mini strawberry sponge cake tacos or something. The one completely covered in chocolate was total overkill and made me feel sick. Honestly, my favorite was the plain tuile with strawberries and whipped cream. No chocolate. The chocolate rim wasn't bad, but it overpowered the cookie's taste. Matt liked them too. They were easy, cheap and quick. So I guess they get a good rating. You're supposed to be able to shape these easily right out of the oven, but I found mine were a little too springy to really hold a tight shape. Maybe I made them too thick, but I liked the taste and consitency of them anyway.

 Following is a recipe taken from a book called “The Chocolate Book”, written by female Dutch Master chef Angélique Schmeinck.
Recipe:
Yields: 20 small butterflies/6 large (butterflies are just an example)
Preparation time batter 10 minutes, waiting time 30 minutes, baking time: 5-10 minutes per batch
65 grams / ¼ cup / 2.3 ounces softened butter (not melted but soft)
60 grams / ½ cup / 2.1 ounces sifted confectioner’s sugar
1 sachet vanilla sugar (7 grams or substitute with a dash of vanilla extract)
2 large egg whites (slightly whisked with a fork)
65 grams / 1/2 cup / 2.3 ounces sifted all purpose flour
1 table spoon cocoa powder/or food coloring of choice
Butter/spray to grease baking sheet
Oven: 180C / 350F
Using a hand whisk or a stand mixer fitted with the paddle (low speed) and cream butter, sugar and vanilla to a paste. Keep stirring while you gradually add the egg whites. Continue to add the flour in small batches and stir to achieve a homogeneous and smooth batter/paste. Be careful to not overmix.
Cover the bowl with plastic wrap and chill in the fridge for at least 30 minutes to firm up. (This batter will keep in the fridge for up to a week, take it out 30 minutes before you plan to use it).
Line a baking sheet with parchment paper or grease with either butter/spray and chill in the fridge for at least 15 minutes. This will help spread the batter more easily if using a stencil/cardboard template such as the butterfly. Press the stencil on the bakingsheet and use an off sided spatula to spread batter. Leave some room in between your shapes. Mix a small part of the batter with the cocoa and a few drops of warm water until evenly colored. Use this colored batter in a paper piping bag and proceed to pipe decorations on the wings and body of the butterfly.
Bake butterflies in a preheated oven (180C/350F) for about 5-10 minutes or until the edges turn golden brown. Immediately release from bakingsheet and proceed to shape/bend the cookies in the desired shape. These cookies have to be shaped when still warm, you might want to bake a small amount at a time or maybe put them in the oven to warm them up again. (Haven’t tried that). Or: place a bakingsheet toward the front of the warm oven, leaving the door half open. The warmth will keep the cookies malleable.
If you don’t want to do stencil shapes, you might want to transfer the batter into a piping bag fitted with a small plain tip. Pipe the desired shapes and bake. Shape immediately after baking using for instance a rolling pin, a broom handle, cups, cones….
Wednesday, January 28, 2009
Crockpot Swiss Chicken
Ok. This recipe is so easy and delicious in my opinion. I RARELY use the crockpot because I can't ever get things other than roasts to turn out well. But this one is a keeper and Matt once said he could eat this meal once a week. I got if from my friend Pam, but I've modified it slightly because we like the sauce a little more plentiful and slightly thinner.
Crockpot Swiss Chicken: serves 2-5 people depending on how big those people are. (i.e. children)
2-3 chicken breasts, pounded thin and sprinkled with salt and pepper
4-6 slices of Swiss cheese (Gruyere is the absolute BEST, but it can be expensive. The baby Swiss seems to melt a little better than just regular Swiss.)
1 small can cream of chicken soup mixed with
1 can of milk (I use the soup can to measure the milk)
1 Box of stuffing (I usually use chicken flavored)
2-4 Tbsp melted butter (Kinda just depends. I start with less and use more if it seems to need more.)
Now, this is not a "pretty" meal. The chicken often breaks apart so you can't just pull out a whole chicken breast in one piece. The stuffing in the sauce is a little mushy, but it really does still taste good.
Crockpot Swiss Chicken: serves 2-5 people depending on how big those people are. (i.e. children)
2-3 chicken breasts, pounded thin and sprinkled with salt and pepper
4-6 slices of Swiss cheese (Gruyere is the absolute BEST, but it can be expensive. The baby Swiss seems to melt a little better than just regular Swiss.)
1 small can cream of chicken soup mixed with
1 can of milk (I use the soup can to measure the milk)
1 Box of stuffing (I usually use chicken flavored)
2-4 Tbsp melted butter (Kinda just depends. I start with less and use more if it seems to need more.)
- Mix the soup and milk in the Crockpot and then push down the chicken with the cheese slices on top so it's covered with the mixture. (That just cuts down on dishes, but you can do it however you please.)
- I generally cook the chicken in the milk/soup mixture about 2-3 hours on high first.*
- After it cooks a couple hours, sprinkle the stuffing on top, lightly pushing some of it down into the sauce and leaving some exposed.
- Pour the melted butter evenly on the exposed stuffing, cover and cook on low 1-2 more hours.
Now, this is not a "pretty" meal. The chicken often breaks apart so you can't just pull out a whole chicken breast in one piece. The stuffing in the sauce is a little mushy, but it really does still taste good.
Wednesday, January 14, 2009
Israeli Couscous with Chicken and Veggies
Now, I don't know how authentic this is (I combined a couple recipes), but it tasted really good. I don't have a picture of the version I made tonight, but it looks a lot like my banner picture but with slightly different veggies. Also, the veggies were cooked on the stove top as opposed to the grill for this one. They are delicious grilled as well. Matt liked eating it with a warmed tortilla since I didn't have any pitas or flat bread. I didn't think it needed anything.
Israeli Couscous with Chicken and Veggies
Makes 4-6 servings
1 Chicken Breast: (If your 4-6 eaters are big meat eaters, double or triple this part. We're not, and we don't like chicken left over, so I only use 1 for the two of us. The left overs are just meatless.)
Cut the chicken breast in pieces. (I cut the thickness in half with a really sharp knife to end up with 2 thin chicken breasts. Then I cut it in strips and cut the strips in 2-3 pieces.)
Marinate the chicken overnight in a ziplock bag with a little olive oil, 1/2 tsp. turmeric, 1 tsp. cumin, 1 tsp. garlic salt and a dash of white pepper.
-----
Veggies I used:
2 carrots, peeled and cut into medium sized pieces
2 medium turnips, peeled and cut into 1 in. squares (got em from our garden)
1 small onion, diced
1 zucchini, cut in quarters and diced in medium sized pieces
1 clove garlic, pressed
I threw a few leftover mushrooms in for good measure and they worked out fine
about 1/2 tsp. tumeric
about 1/2 tsp. cumin
2 pinches kosher salt
dash of cayenne if you like some heat
olive oil
(You could also add and/or substitute: celery and/or red or orange bell peppers)
Directions:
Couscous:
1 1/2 C. Israeli Couscous (the big pearl kind, not the instant)
2 C. broth (veggie or chicken-I used chicken but most recipes I saw called for veggie)
Boil the water and add the couscous. Cover, reduce heat and simmer 10 min. while stirring occasionally.
Mix cooked couscous and cooked veggies. Season with salt and pepper to your liking.
Israeli Couscous with Chicken and Veggies
Makes 4-6 servings
1 Chicken Breast: (If your 4-6 eaters are big meat eaters, double or triple this part. We're not, and we don't like chicken left over, so I only use 1 for the two of us. The left overs are just meatless.)
Cut the chicken breast in pieces. (I cut the thickness in half with a really sharp knife to end up with 2 thin chicken breasts. Then I cut it in strips and cut the strips in 2-3 pieces.)
Marinate the chicken overnight in a ziplock bag with a little olive oil, 1/2 tsp. turmeric, 1 tsp. cumin, 1 tsp. garlic salt and a dash of white pepper.
-----
Veggies I used:
2 carrots, peeled and cut into medium sized pieces
2 medium turnips, peeled and cut into 1 in. squares (got em from our garden)
1 small onion, diced
1 zucchini, cut in quarters and diced in medium sized pieces
1 clove garlic, pressed
I threw a few leftover mushrooms in for good measure and they worked out fine
about 1/2 tsp. tumeric
about 1/2 tsp. cumin
2 pinches kosher salt
dash of cayenne if you like some heat
olive oil
(You could also add and/or substitute: celery and/or red or orange bell peppers)
Directions:
- Put a swirl of olive oil in the bottom of a big pot.
- Cook the carrots on medium high heat, covered but stir occasionally for 2-3 min. Add onions and turnips. Cook covered, but stir occasionally until crisp-tender maybe another 7 min. or so.
- When those veggies are crisp tender, add in marinated chicken. Cook until no longer pink.
- Add zucchini, mushrooms, garlic, cumin, turmeric, and cayenne. Cook uncovered a couple more min. until those are tender but not overcooked.
Couscous:
1 1/2 C. Israeli Couscous (the big pearl kind, not the instant)
2 C. broth (veggie or chicken-I used chicken but most recipes I saw called for veggie)
Boil the water and add the couscous. Cover, reduce heat and simmer 10 min. while stirring occasionally.
Mix cooked couscous and cooked veggies. Season with salt and pepper to your liking.
Subscribe to:
Posts (Atom)

